ImageMagick Tricks and Snippets
create a stack of images
e.g. all images named inputimage01.tif .. inputimage99.tif in one folder should be converted to one image-stack
convert -adjoin inputimage*.tif outputimage.tif
“-adjoin” is optional, if outputimage-format can contain multiple images
resize image
- percentage
mogrify -resize 50% image.jpg
- to maximal size (all images in current folder)
mogrify -resize 256x256 *.jpg
- resize and change bit-depth
mogrify -resize 2994x2994 -depth 8 *.tif
shave image
shave off at the image edges to leave away unnecessary parts
mogrify -shave <width>x<height> *.tif
crop image
central crop
mogrify -gravity Center -crop 50x80%+0+0 *
crops image to 50% of width and 80% of height
very small
mogrify -shave 1750x250 -chop 450x0 -crop +0-250 +repage *
modifies image  into smaller, cropped image
 ![]() (rescaled for illustration purposes)
(rescaled for illustration purposes)
"-shave 1750x250"
shaves 1750px left/right and 250 pixel on the top/bottom
"-chop 450x0"
chops off 450 pixel on the left side
"-crop +0-250 +repage"
chops off 250 pixel at the bottom side and repages the canvas of the image.
all info is taken from the IM help
convert
all images in folder from png to jpg
mogrify -format jpg *.png
all images in folder from jpg to eps
mogrify -format eps *.jpg
create a movie out of still images
convert *.jpg movie.mpg
create a listing
to create a listing of the filenames with their size into a textfile use
identify -format "[\"%f\",%w,%h];\n" *.jpg > listing.txt
[via erik krause]
make a montage of a bunch of images
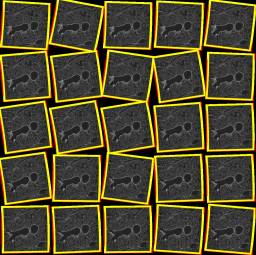
Take a directory full of images and make a nice montage, polaroid-style
montage *.tif -bordercolor yellow -background red \\
    +polaroid -gravity center -background none -geometry -50-50 polaroid.png
Keep in mind that this only works for not very big amounts of not very big images, so “resize” them first. The resulting image is really big, so you might need to resiye that too…
You might also prefer to change the -bordercolor to “white” and the -background to “black”, here it is yellow and red for demonstration purposes…
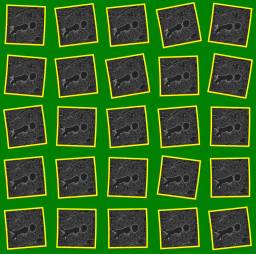
montage *.tif -thumbnail 256x256 -bordercolor yellow -background red +polaroid \\
    -gravity center -background green -geometry +1+1 polaroid-green.png
makes 256×256 -sized thumbnails first and adds a small (1×1) border around each image, so they line up nicely. Substitute “yellow” with “white”, “red” with “black” and “green” with “none” to have a useable result…
adapted from the ImageMagick help

