Table of Contents
![]() ImageProcessing-Tricks with ImageJ, ImageMagick and MeVisLab
ImageProcessing-Tricks with ImageJ, ImageMagick and MeVisLab
IsoSurface-Visualization
Use a GVRVolumeLoad-Module to load a .gvr-File (such as the one created with the network above). “GigaVolume” is the preferred file format of MeVisLab, since it incorporated the full dataset in multiple resolutions as part of an octree (see here for more details) and makes calculations easy…
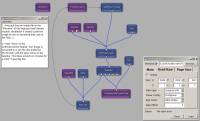
 It's probaly easiest if you recreate the network on the right (Click on Thumbnail to see it better!). If you're lazy, you can download the file here: isosurface.mlab
Explanation:
- LocalImage just loads a default bone CT scan.
- GCRVolumeSave (saves it as a .gvr-File)
- GVRVolumeLoad (does what it says)
- GVRVolumeToImage converts the volume to an image. Choose the “Node Height” according to your needs and machine specifications.
- View3D1, View2D, OrthoView2D1 show different views of the dataset
- Diagram2D and SoRenderArea show the Histogram of the data, nice to know for the IsoSurface
- ROISelect (does what is says, it selects a ROI from the original dataset)
- Switch lets you switch between the ROI and the full dataset
- IsoSurface calculated the IsoSurface of the data with a chosen threshold
- SoEWMRenderer renders the IsoSurface to the SoExaminerViewer which has a SoBackground attached for a nice gradient Background
- The SoSeparator with attached SoTransaltion translate the IsoSurface in space so we can show the original dataset and the IsoSurface in conjucntion with a View3d (with toggled InventorInputs)
put file-dimension into the name of the saved file
 easiest way to add the size of the images into the saved filename1) is to use an info-module to get the size of the data, concatenate this info into a string with “StringUtils” and add a descriptor with another “StringUtils”. This string can then be used with the postfix-field of the “ImgSave”-module.
An exemplary network for your perusal is shown on the right and can be downloaded here: filenameinfo.mlab.
Render a Video
The simples way to generate a movie of e.g. a rotation your visualization is to use the internal movie-possibilities of MeVisLab.
First, generate your network, and use a SoCustomExaminerViewer or SoExaminerViewer for visualizing your result (see image below or use the premade network movie.mlab)

Use the right mouse button to open the panel of the SoCustomExaminerViewer

On the “Rotation”-tab, you can set the Rotation Steps and Angles. Don't forget to turn on “Record Rotation”! With this, MeVisLab will record how your visualization looks while it's rotating (see left image below). When the rotation is finished, change to the “Movie”-tab and press “Record Movie” (see central image below). Another sheet should open and you should be able to save the movie or the movie stills. I'm generally using the ScreenshotGallery, which is set to be my Desktop (use the preferences of MeVisLab to set it to a directory of your choice), but you can set any directory of your choice (see right image below).


I've had only bad luck with using the “Create Video” option in the “Movie Creation Box”2). So I'm usign the “Do not create movie…” option and save the still images to my harddisk. Afterwards, some ImageMagick-Skills along the lines of
convert *.tif movie.mpg
should do the trick of creating a movie out of your still files.
I'm generally using QuickTime Player Pro to generate a movie since I'm presenting with Keynote, but the process from Still images to a movie should be fairly easy with any choice of program you prefer…
In the end you should have a movie like the one shown below
Final Movie
If it's not shown directly, you can download the movie as movie.mpg here (444 KB)
how to convert a stack of files into .GVR
- Use “File > Import > Image Sequence” in ImageJ to open a stack of TIFFs from TOMCAT. If you open them with “Use virtual stack”, you can load volumes bigger than the RAM of your PC.
- Save the (virtual) stack as .raw using “File > Save as > Raw Data”.
- make a note of the dimensions of the file dimension (x*y*z), you'll need them afterwards. It's probably best to write them into the filename…
- use the file saveasgvr.mlab (seen on the right) to load this .RAW-file. Members of the Schittny-Group find such a more adapted file in U:Gruppe_Schittny:MeVisLab
- enter the dimension you've noted before into the ImgLoad-module (also on the right)
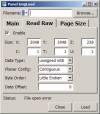
- press save in the GVRSave-Module (after having chosen the correct path…)
- let MeVisLab calculate for a looooong time.
- enjoy your .GVR-file for further calculations. It will be saved to your SaveFileDirectory (found in the preferences: set to “Desktop” for easy access…)

